mirror of
https://github.com/UberGuidoZ/Flipper.git
synced 2024-12-31 19:00:17 +00:00
111 lines
7.4 KiB
Markdown
111 lines
7.4 KiB
Markdown
# Official info
|
|
|
|
The Wifi devboard ships with [Blackmagic firmware](https://github.com/flipperdevices/blackmagic-esp32-s2) installed. The Flipper documentation [is here](https://docs.flipperzero.one/development/hardware/wifi-debugger-module), and Blackmagic is [over here](https://black-magic.org/).
|
|
|
|
Quick start: Connect to the SSID `blackmagic` using the password `iamwitcher` or plug the wifi devboard in via USB.
|
|
|
|
# ESP32 Wi-Fi Pentest Tool
|
|
|
|
Check out [Frog's write-up](https://github.com/FroggMaster/ESP32-Wi-Fi-Penetration-Tool) and build for quick and easy flashing! Seriously, it's basically just a double-click now thanks to some error checking and automation. ([You're welcome!](https://github.com/FroggMaster/ESP32-Wi-Fi-Penetration-Tool/compare/v1.0...v1.1)).
|
|
|
|
# ESP32 WiFi Scanner Module
|
|
|
|
Another fun project is from [SequoiaSan](https://github.com/SequoiaSan)! Originally designed for an ESP8266, it has been ported to run on the Flipper Wifi Devboard too.<br>
|
|
Check out the [Release Info](https://github.com/SequoiaSan/FlipperZero-WiFi-Scanner_Module) and [Install Instructions](https://github.com/SequoiaSan/Guide-How-To-Upload-bin-to-ESP8266-ESP32) direct from the source. (Some pinout info is included there and on my [GPIO page](https://github.com/UberGuidoZ/Flipper/tree/main/GPIO).)
|
|
|
|
# ESP8266 WiFi Deauther Module (not devboard...)
|
|
|
|
Yet another fun project is from [SequoiaSan](https://github.com/SequoiaSan)! Only working/designed for an ESP8266, but porting it to run on the Flipper Wifi Devboard is a WIP.<br>
|
|
Check out the [Release Info](https://github.com/SequoiaSan/FlipperZero-Wifi-ESP8266-Deauther-Module) and [Install Instructions](https://github.com/SequoiaSan/FlipperZero-Wifi-ESP8266-Deauther-Module#how-to) direct from the source. (Some pinout info is included there and on my [GPIO page](https://github.com/UberGuidoZ/Flipper/tree/main/GPIO).)
|
|
|
|

|
|
|
|
Sequoia has been kind enough to create a [web flasher](https://sequoiasan.github.io/FlipperZero-Wifi-ESP8266-Deauther-Module/). Once you've gotten things flashed, here's some quick instructions [from Discord](https://discord.com/channels/937479784148115456/978425715525582918/1004397635098120274) for accessing the Web Interface: Connect to the SSID `pwned` with the password of `deauther` then use a browser to go to http://192.168.4.1
|
|
|
|
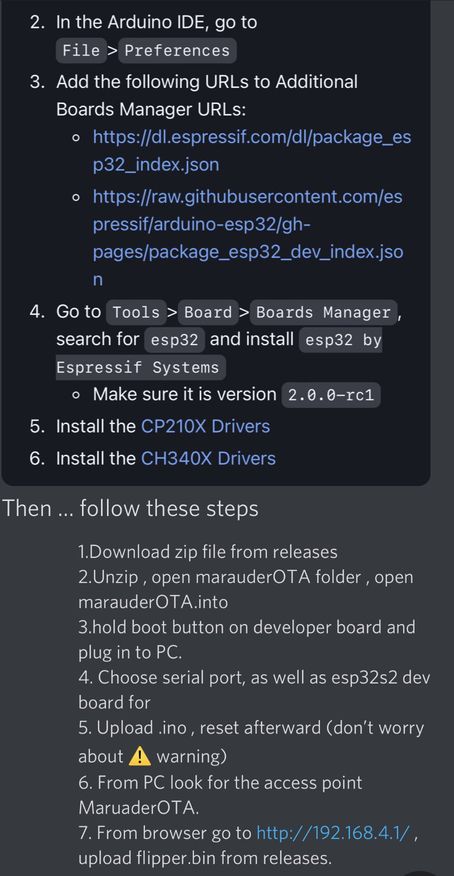
# [Marauder](https://github.com/justcallmekoko/ESP32Marauder) install information<br>
|
|
(Direct from the dev WillStunForFood on Discord - check out [his video walkthrough](https://www.youtube.com/watch?v=_YLTpNo5xa0) too!):
|
|
|
|
- Plug the WiFi dev board directly into your PC
|
|
- Upload the MarauderOTA firmware from source via Arduino IDE
|
|
- Use the MarauderOTA firmware to flash the Marauder Flipper bin over WiFi
|
|
|
|
The first step in the wiki documentation [starts here](https://github.com/justcallmekoko/ESP32Marauder/wiki/flipper-zerowhile).<br>
|
|
(Then you should have the necessary links to the follow on documentation to get the firmware installed.)
|
|
|
|
ESP32-S2 is the correct board if you are installing on the Flipper WiFi Dev Board. <br>
|
|
If you are using the Marauder OTA method, you shouldn't have to install any libraries. <br>
|
|
The only other thing you should have to install is the boards for the ESP32 in the Arduino IDE and the drivers for the ESP32-S2.
|
|
|
|
You can connect to Marauder in a handful of ways (make sure qFlipper is CLOSED):<br>
|
|
- Through Flipper's USB-C on a computer ([PuTTY](https://www.chiark.greenend.org.uk/~sgtatham/putty/latest.html) is good for Windows, find the COM port with [USB Device Tree View](https://www.uwe-sieber.de/usbtreeview_e.html).)<br>
|
|
- If you'd rather go direct to the devboard, plug it in directly and give PuTTY a go like above.<br>
|
|
- If you have an Android phone, many have had success with the [Serial USB Terminal](https://play.google.com/store/apps/details?id=de.kai_morich.serial_usb_terminal) app.
|
|
|
|
Commands `channel`, `scanap`, `sniffbeacon`, `sniffdeauth`, `sniffpmkid`, `stopscan`, `clearap`, `ssid`, `update`
|
|
|
|
------------------------------------------------------------------------------
|
|
|
|
The `ssid` command is to edit the SSID list used for beacon attacks for when when you're running something like `attack -t beacon -l`<br>
|
|
You can also use something like `ssid -a -g 4` to randomly generate four SSIDs to the list. (Check it with `list -s` to see them!)<br>
|
|
To add an SSID by name, use `ssid -a -n YourSSID` and replace `YourSSID` with the SSID name you would like.<br>
|
|
Lastly, to remove an SSID from the list, use `list -s` then `ssid -r #` replacing # with the number from the list command.
|
|
|
|
------------------------------------------------------------------------------
|
|
|
|
To update the installed FW, you can use the `update -w` option, then follow along from [Step 8 in the install guide](https://github.com/justcallmekoko/ESP32Marauder/wiki/installing-firmware-via-ota).
|
|
|
|
------------------------------------------------------------------------------
|
|
|
|
Example Attack Profile ([from Discord](https://discord.com/channels/740930220399525928/967843558520418384/997185157175988264)):
|
|
|
|
Use command `scanap` stop with `stopscan` when done.
|
|
|
|
List all found Beacons from previous steps via `list -a`
|
|
|
|
Note the enumeration of your target Beacon...
|
|
|
|
Use `select -a x` command to select your target. (x being your target # from previous step)
|
|
|
|
Execute chosen attack `attack -t deauth`
|
|
|
|
Use `stopscan` when done.
|
|
|
|
-----------------------------------------------------------------------------------
|
|
|
|
Connecting to the devboard with a Mac ([from Discord](https://discord.com/channels/740930220399525928/967843558520418384/998043936977330276))
|
|
|
|
Open Terminal
|
|
|
|
Enter ls /dev/tty.*
|
|
|
|
You will be provided with several USB directories. Select one that has your flippers name in it example: /dev/tty.usbmodemflip_XXXXX3
|
|
|
|
Add "screen" in the prefix and the baud rate as the suffix to the command after copy pasting.....
|
|
|
|
screen /dev/tty.usbmodemflip_XXXXX3 115200
|
|
|
|
Hit reset on the flipper board and you'll see it populate. If it doesn't, simply try the other flipper directory name.
|
|
|
|
-----------------------------------------------------------------------------------
|
|
|
|
# Quick steps from Rabid Root...
|
|
|
|
<br>
|
|

|
|
|
|
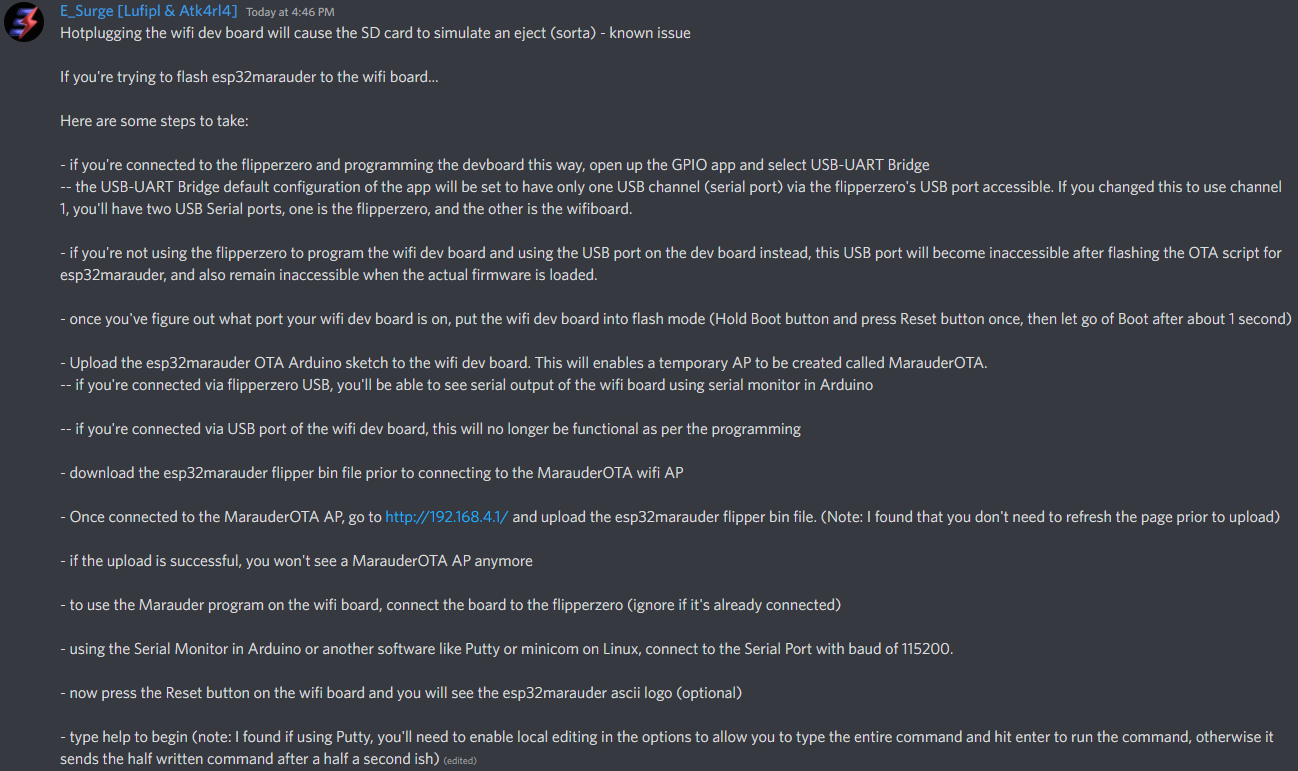
# AND a great step by step from E_Surge!
|
|
|
|

|
|
|
|
Also from E_Surge: "Flashed esp32marauder directly to the esp32-s2 using the esptool command -- wasn't working until a PC restart and boom. But it took about three hours of different methods, attempts, and finally restarting of devices etc."
|
|
|
|
`esptool -p PORT -b 460800 --before default_reset --after hard_reset --chip esp32s2 write_flash --flash_mode dio --flash_freq 80m --flash_size 4MB 0x10000 esp32_marauder_v0_9_9_20220628_flipper.bin`
|
|
|
|
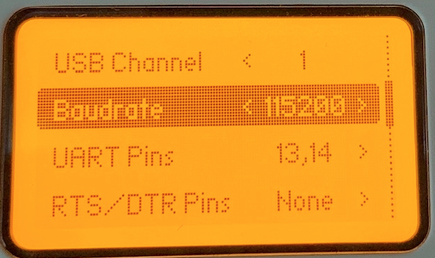
# If serial connection looks scrambled... (thanks Frog!)
|
|

|
|
|
|

|
|
|
|
Frog also noted that it's wise to reflash the Flipper firmware if such issues are persisting.<br>
|
|
Start with the Official firmware, test, then move to a unlocked one if desired.
|