On some user systems, the ESP-32 needs time to recover after the erase command. Adding a PAUSE after the erase command allows the ESP-32 to recover and flash successfully. |
||
|---|---|---|
| .. | ||
| FZ_Marauder_Flasher | ||
| ReadMe.md | ||
Official info
The Wifi devboard ships with Blackmagic firmware installed. The Flipper documentation is here, and Blackmagic is over here.
Quick start: Connect to the SSID blackmagic using the password iamwitcher or plug the wifi devboard in via USB.
ESP32 Wi-Fi Pentest Tool
Check out Frog's write-up and build for quick and easy flashing! Seriously, it's basically just a double-click now thanks to some error checking and automation. (You're welcome!).
ESP32 WiFi Scanner Module
Another fun project is from SequoiaSan! Originally designed for an ESP8266, it has been ported to run on the Flipper Wifi Devboard too.
Check out the Release Info and Install Instructions direct from the source. (Some pinout info is included there and on my GPIO page.)
Sequoia has been kind enough to create a web flasher if you want to avoid the Arduino IDE.
ESP8266 WiFi Deauther Module (not devboard...)
Yet another fun project is from SequoiaSan! Only working/designed for an ESP8266, but porting it to run on the Flipper Wifi Devboard is a WIP.
Check out the Release Info and Install Instructions direct from the source. (Some pinout info is included there and on my GPIO page.)
Sequoia has been kind enough to create a web flasher. Once you've gotten things flashed, here's some quick instructions from Discord for accessing the Web Interface: Connect to the SSID pwned with the password of deauther then use a browser to go to http://192.168.4.1
Marauder install information
New easy flash tool for Windows now available! CLICK HERE
Direct from the dev WillStunForFood on Discord - check out his video walkthrough too!:
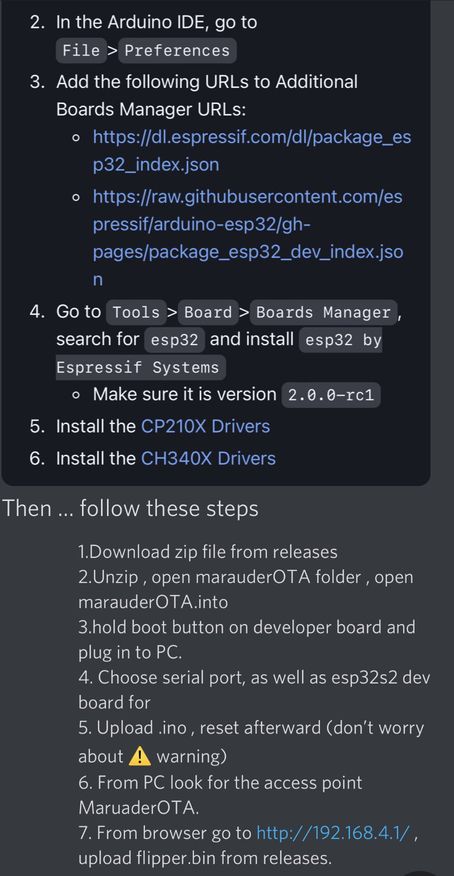
- Plug the WiFi dev board directly into your PC
- Upload the MarauderOTA firmware from source via Arduino IDE
- Use the MarauderOTA firmware to flash the Marauder Flipper bin over WiFi
The first step in the wiki documentation starts here.
(Then you should have the necessary links to the follow on documentation to get the firmware installed.)
ESP32-S2 is the correct board if you are installing on the Flipper WiFi Dev Board.
If you are using the Marauder OTA method, you shouldn't have to install any libraries.
The only other thing you should have to install is the boards for the ESP32 in the Arduino IDE and the drivers for the ESP32-S2.
You can connect to Marauder in a handful of ways (make sure qFlipper is CLOSED):
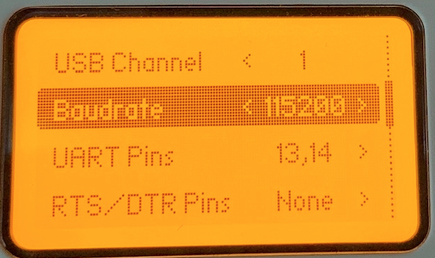
- Through Flipper's USB-C on a computer (PuTTY is good for Windows, find the COM port with USB Device Tree View.)
- If you'd rather go direct to the devboard, plug it in directly and give PuTTY a go like above.
- If you have an Android phone, many have had success with the Serial USB Terminal app.
Commands channel, scanap, sniffbeacon, sniffdeauth, sniffpmkid, stopscan, clearap, ssid, update
LED info when using Marauder
Blue is sniffing
Red is attacking
SSID Command
The ssid command is to edit the SSID list used for beacon attacks for when when you're running something like attack -t beacon -l
You can also use something like ssid -a -g 4 to randomly generate four SSIDs to the list. (Check it with list -s to see them!)
To add an SSID by name, use ssid -a -n YourSSID and replace YourSSID with the SSID name you would like.
Lastly, to remove an SSID from the list, use list -s then ssid -r # replacing # with the number from the list command.
There is more to play with regarding ssid commands! From cococode, you can do this:
- ssid -a -n (name you want to show)
- list -s
- select -s (index from list)
- attack -t beacon -l
- attack -t rickroll
To update the installed FW, you can use the update -w option, then follow along from Step 8 in the install guide.
Example Attack Profile (from Discord):
Use command scanap stop with stopscan when done.
List all found Beacons from previous steps via list -a
Note the enumeration of your target Beacon...
Use select -a x command to select your target. (x being your target # from previous step)
Execute chosen attack attack -t deauth
Use stopscan when done.
Connecting to the devboard with a Mac (from Discord)
Open Terminal
Enter ls /dev/tty.*
You will be provided with several USB directories. Select one that has your flippers name in it example: /dev/tty.usbmodemflip_XXXXX3
Add "screen" in the prefix and the baud rate as the suffix to the command after copy pasting.....
screen /dev/tty.usbmodemflip_XXXXX3 115200
Hit reset on the flipper board and you'll see it populate. If it doesn't, simply try the other flipper directory name.
Quick steps from Rabid Root...
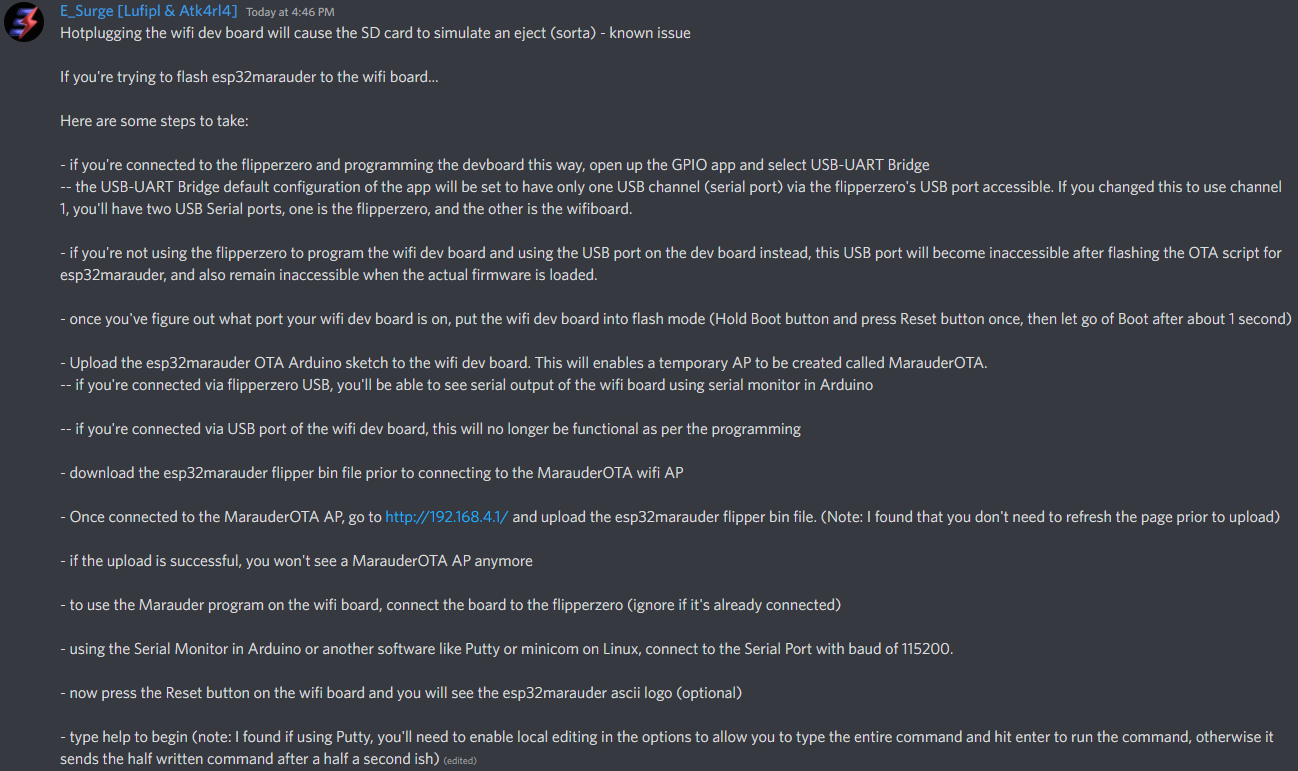
AND a great step by step from E_Surge!
Also from E_Surge: "Flashed esp32marauder directly to the esp32-s2 using the esptool command -- wasn't working until a PC restart and boom. But it took about three hours of different methods, attempts, and finally restarting of devices etc."
esptool -p PORT -b 460800 --before default_reset --after hard_reset --chip esp32s2 write_flash --flash_mode dio --flash_freq 80m --flash_size 4MB 0x10000 esp32_marauder_v0_9_9_20220628_flipper.bin
If serial connection looks scrambled... (thanks Frog!)
Frog also noted that it's wise to reflash the Flipper firmware if such issues are persisting.
Start with the Official firmware, test, then move to a unlocked one if desired.
I've had so many asking for me to add this.


BTC: 3AWgaL3FxquakP15ZVDxr8q8xVTc5Q75dS
BCH: 17nWCvf2YPMZ3F3H1seX8T149Z9E3BMKXk
ETH: 0x0f0003fCB0bD9355Ad7B124c30b9F3D860D5E191
LTC: M8Ujk52U27bkm1ksiWUyteL8b3rRQVMke2
So, here it is. All donations of any size are humbly appreciated.


Donations will be used for hardware (and maybe caffeine) to further testing!


